Although I am a paid consultant for Brother International, my opinions are my own and come from my genuine experience with working with these products.
What I have loved the most about my ScanNCut machine is the versatility to cut a variety of surfaces. I have cut, denim, canvas, leather, Cardstock, chipboard, fabric, vinyl and tissue paper as well as a whole lot of other fun surfaces.
I want to share with you today a quick tutorial on how I used both my ScanNcut and my Innov-is 950D by Brother International (tm) to create this inexpensive tissue paper from dollar store tissue paper.
First I started out by taking three shapes of scalloped circles (designs already loaded in the machine) and repeated them three times. I tried to make sure that all of the shapes were close together to save space (you can also use one of the auto layout modes, or what I like to call space saver mode)
Because when I cut my tissue paper into quarters, the pieces are not all the same size, this is where ScanNCut's built in scanner works like a charm.
here I have scanned in my background (I used the desaturated option so I can see my cut lines best) This allows me to see exactly where my cut lines will be and where my surface is.
How cool is that???

And here are my cut scalloped circles after I take off the negative cut area.
Having the scanner, really helps me to make the most of my surface are to cut as much as I can from my one sheet.
Next I gathered some shapes and layered them by size, sewing the middles of each flowers.
(for these flowers layer two large, one medium and one small)
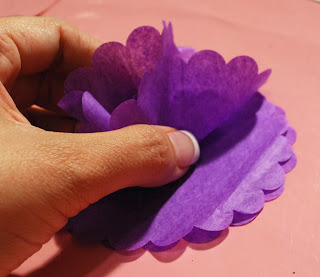
To fluff up your bloom, start in the middle and pinch the center at the seam. then work your way towards to outer layers and continue to pinch upwards.
Here are a few of the blooms.
Now to create you garland (double sided puffy ball style garland) you will take two of the same colored blooms and sew the flat backs overlapping with one small stitch (back and forth). This will allow the fullness of your two blooms to be facing outwards and the flat backs to be facing each other.
Do not cut your thread once you are done sewing. Here is my secret to creating your delicate garland... Once you sew your blooms together, pull your remainder thread out measure it 12 inches and then sew your next bloom. Repeat this so that you can create you delicate garland. To store your garland, simple wrap it length wise with paper and then fold to store. The flowers can always be fluffed up as needed.
And here is the garland hung up and ready for a party... (now one thing that you will want to remember is to cut off any loose threads... I forgot one here, oops!)
Thanks for stopping by,
~Liz ♥


This is so cooL!
ReplyDelete